Cara Install Observium di Centos 7

Assalamu’alaikum Warahmatullahi Wabarakatuh, Selamat pagi sobat blogger sekalian, apa kabar semuanya... Pada kesempatan kali ini saya akan share bagaimana cara install observium di centos 7 dan bagaimana cara konfigurasinya.
Observium adalah platform network monitoring yang mendukung berbagai jenis perangkat, platform, dan sistem operasi seperti Cisco, Windows, Linux, HP, Juniper, Dell, FreeBSD, Brocade, Netscaler, NetApp, dan banyak lagi.
Observium berfokus pada penyediaan antarmuka
yang cantik dan kuat namun sederhana dan intuitif untuk kesehatan dan status
jaringan Anda.
Pada tutorial kali ini, sobat akan belajar cara
menginstal dan mengkonfigurasi Observium di Centos 7. Sebelumnya pastikan pada settingan SELinux dalam keadaan disabled. Ok langsung saja bagaimana cara
installasinya ikuti step by step Tutorial berikut.
Note : Disable SELinux
[root@srv1 ~]# getenforce
Disabled
Berikut Step by step cara install Observium di Centos7 Minimal Server Fresh Install
1. Update Repository
Tambahkan repositori berikutyum install https://dl.fedoraproject.org/pub/epel/epel-release-latest-7.noarch.rpm
yum install http://yum.opennms.org/repofiles/opennms-repo-stable-rhel7.noarch.rpm
yum install http://rpms.remirepo.net/enterprise/remi-release-7.rpm
2. Update and Install Packages
Update paket[root@srv1 ~]# yum install yum-utils [root@srv1 ~]# yum-config-manager --enable remi-php72 [root@srv1 ~]# yum updateInstall paket paket yang dibutuhkan untuk Observium
yum install wget.x86_64 httpd.x86_64 php.x86_64 php-opcache.x86_64 php-mysql.x86_64 php-gd.x86_64 \
            php-posix php-pear.noarch cronie.x86_64 net-snmp.x86_64 net-snmp-utils.x86_64 \
            fping.x86_64 mariadb-server.x86_64 mariadb.x86_64 MySQL-python.x86_64 rrdtool.x86_64 \
            subversion.x86_64  jwhois.x86_64 ipmitool.x86_64 graphviz.x86_64 ImageMagick.x86_64 \
            php-sodium.x86_64
3. Download Observium
Sebelumnya kita buat dahulu direktori untuk Observium di direktori /opt
[root@srv1 ~]# mkdir -p /opt/observium && cd /opt
[root@srv1 opt]# wget http://www.observium.org/observium-community-latest.tar.gz
[root@srv1 opt]# tar zxvf observium-community-latest.tar.gz
4. Buat Database
Aktifkan service database mariadb
[root@srv1 opt]# systemctl start mariadb
[root@srv1 opt]# systemctl enable mariadb
Lalu buat password database dengan menjalankan perintah berikut
[root@srv1 opt]# mysql_secure_installationatau
Set the MySQL root password:
/usr/bin/mysqladmin -u root password 'mysql root password'
Buat database
mysql -u root -p
CREATE DATABASE dbobservium;
CREATE USER 'observuser'@'localhost' IDENTIFIED BY 'password';
GRANT ALL PRIVILEGES ON dbobservium.* TO 'observuser'@'localhost';
exit
5. Konfigurasi Observium
Copy file config.php.default menjadi config.php
[root@srv1 opt]# cd observium
[root@srv1 observium]# cp config.php.default config.php
Lalu edit seperti dibawah ini
[root@srv1 observium]# nano config.php

// Database config ---  This MUST be configured
$config['db_extension'] = 'mysqli';
$config['db_host']      = 'localhost';
$config['db_user']      = 'observuser';
$config['db_pass']      = 'password';
$config['db_name']      = 'dbobservium';
Restart service Mariadb
[root@srv1 observium]# systemctl restart mariadb
Jalankan perintah discovery.php script untuk memasukan MySQL Schema
[root@srv1 observium]# ./discovery.php -u
6. Edit Fping
Tambahkan path direktori fping pada file config.php
[root@srv1 observium]# which fping
/sbin/fping
Edit file config.php lalu tambahkan script pada baris akhir
[root@srv1 observium]# nano config.php

// Tambahkan baris berikut
$config['fping'] = "/sbin/fping";
7. Konfigurasi Httpd
Jalankan perintah berikut untuk mengaktifkan service Httpd
[root@srv1 observium]# systemctl start httpd
[root@srv1 observium]# systemctl enable httpd
Lalu tambahkan service http pada Firewalld
[root@srv1 observium]# firewall-cmd --add-service=http --permanent
[root@srv1 observium]# firewall-cmd --reload
Buat file observium.conf pada direktori /etc/httpd/conf.d/ lalu tambahkan script dibawah ini.
[root@srv1 observium]# nano /etc/httpd/conf.d/observium.conf
<VirtualHost *>
   DocumentRoot /opt/observium/html/
   ServerName  observium.domain.com
   CustomLog /opt/observium/logs/access_log combined
   ErrorLog /opt/observium/logs/error_log
   <Directory "/opt/observium/html/">
     AllowOverride All
     Options FollowSymLinks MultiViews
     Require all granted
   </Directory>
</VirtualHost>
Buat direktori logs dan rrd
[root@srv1 observium]# mkdir logs
chown apache:apache logs

[root@srv1 observium]# mkdir rrd
chown apache:apache rrd
Restart service Httpd
[root@srv1 observium]# systemctl restart httpdTambahkan user login dengan level 10 ini digunakan untuk login ke observium
[root@srv1 observium]# ./adduser.php admin password 10
Tambahkan cron jobs, buat file baru /etc/cron.d/observium lalu tambahkan script dibawah ini
[root@srv1 observium]# nano /etc/cron.d/observium
# Run a complete discovery of all devices once every 6 hours
33  */6   * * *   root    /opt/observium/discovery.php -h all >> /dev/null 2>&1

# Run automated discovery of newly added devices every 5 minutes
*/5 *     * * *   root    /opt/observium/discovery.php -h new >> /dev/null 2>&1

# Run multithreaded poller wrapper every 5 minutes
*/5 *     * * *   root    /opt/observium/poller-wrapper.py >> /dev/null 2>&1

# Run housekeeping script daily for syslog, eventlog and alert log
13 5 * * * root /opt/observium/housekeeping.php -ysel

# Run housekeeping script daily for rrds, ports, orphaned entries in the database and performance data
47 4 * * * root /opt/observium/housekeeping.php -yrptb
Reload service crond[root@srv1 observium]# systemctl reload crond
8. Setting SNMP
Jalankan perintah berikut untuk mendeteksi type Distro Linux yang akan dimonitor.
[root@srv1 observium]# wget -O /usr/local/bin/distro https://gitlab.com/observium/distroscript/raw/master/distro
[root@srv1 observium]# chmod +x /usr/local/bin/distro
Rename file snmpd.conf
[root@srv1 observium]# mv /etc/snmp/snmpd.conf /etc/snmp/snmpd.conf.oriCopy file snmpd.conf.example ke direktori /etc/snmp/
[root@srv1 observium]# cp snmpd.conf.example /etc/snmp/Rename file snmpd.conf.example menjadi snmpd.conf
[root@srv1 observium]# mv /etc/snmp/snmpd.conf.example /etc/snmp/snmpd.confAktifkan service snmpd
[root@srv1 observium]# systemctl start snmpd
[root@srv1 observium]# systemctl enable snmpd
Edit file snmpd.conf seperti dibawah ini
[root@srv1 observium]# nano /etc/snmp/snmpd.conf

#  Listen for connections on all interfaces (both IPv4 *and* IPv6)
agentAddress udp:161,udp6:[::1]:161

#  Full view access
view   all         included   .1

#  system + hrSystem groups only
view   systemonly  included   .1.3.6.1.2.1.1
view   systemonly  included   .1.3.6.1.2.1.25.1

#  Default access to full view
rocommunity observium  default    -V all

#  Default access to basic system info
#rocommunity public  default    -V systemonly

#  System contact and location
syslocation Jakarta
syscontact sysadmin <admin@example.com>

#  Disk Monitoring
disk       /     10000
disk       /var  5%
includeAllDisks  10%

# Unacceptable 1-, 5-, and 15-minute load averages
load   12 10 5

# This line allows Observium to detect the host OS if the distro script is installed
extend .1.3.6.1.4.1.2021.7890.1 distro /usr/local/bin/distro

# This lines allows Observium to detect hardware, vendor and serial
extend .1.3.6.1.4.1.2021.7890.2 hardware /bin/cat /sys/devices/virtual/dmi/id/product_name
extend .1.3.6.1.4.1.2021.7890.3 vendor   /bin/cat /sys/devices/virtual/dmi/id/sys_vendor
extend .1.3.6.1.4.1.2021.7890.4 serial   /bin/cat /sys/devices/virtual/dmi/id/product_serial

# This line allows Observium to collect an accurate uptime
extend uptime /bin/cat /proc/uptime

# This line enables Observium's ifAlias description injection
#pass_persist .1.3.6.1.2.1.31.1.1.1.18 /usr/local/bin/ifAlias_persist
Resrtart service snmpd
[root@srv1 observium]# systemctl restart snmpd
[root@srv1 observium]# systemctl status snmpd
Tambahkan service snmp di firewalld
[root@srv1 observium]# firewall-cmd --add-service=snmp --permanent
[root@srv1 observium]# firewall-cmd --reload
Untuk pengetesan jalankan perintah dibawah ini
[root@srv1 observium]# snmpwalk -v2c -c observium localhost
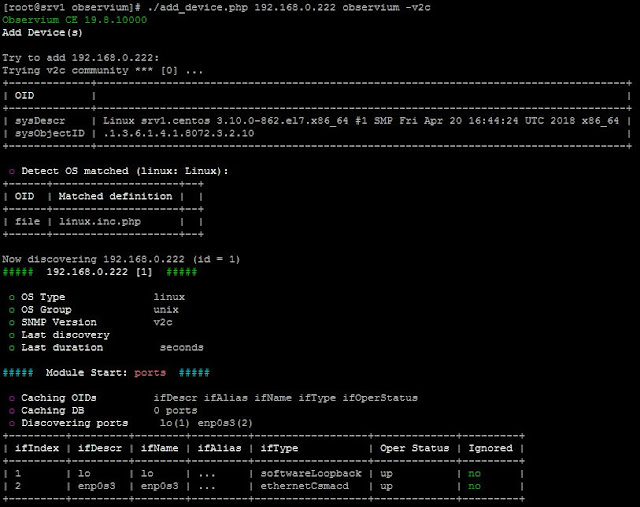
Untuk menambahkan Host yang akan kita monitor jalankan perintah berikut ./add_device.php <hostname> <community> v2c IP 192.168.0.222 adalah ip localhost
[root@srv1 observium]# ./add_device.php 192.168.0.222 observium v2c
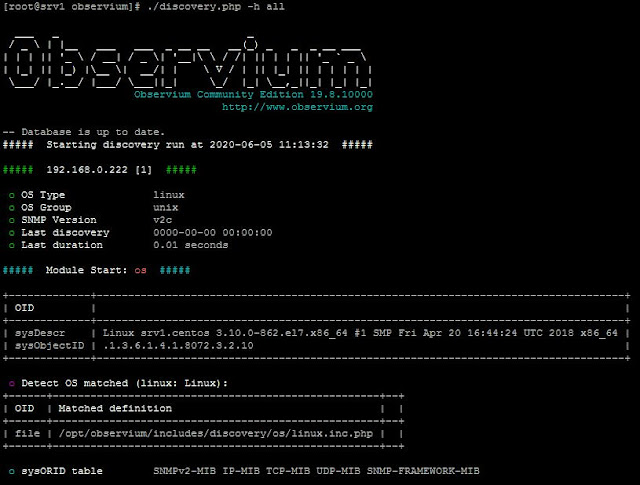
Tambahkan juga Host-Host yang akan dimonitoring dengan langkah yang sama mulai dari install snmp dan setting snmp Selanjutnya Update database discover dan poller
[root@srv1 observium]# ./discovery.php -h all
[root@srv1 observium]# ./poller.php -h all
Baca Juga : Cara Install Cacti di Centos 8
Baca Juga : Cara Konfigurasi Cacti di Centos 8
9. Web Configuration
Untuk pengetesan buka browser lalu masukan pada url http://[Server ip] masukan user dan password
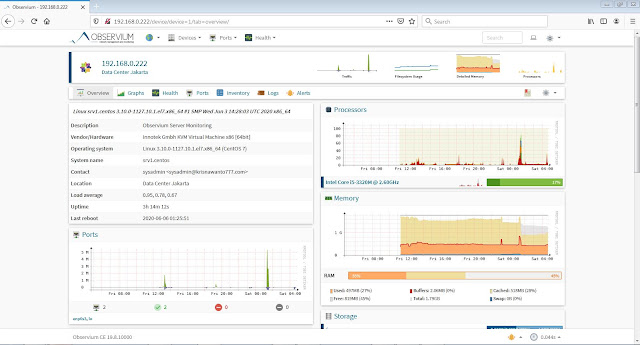
Tampilan Dashboard Observium
Tampilan Dashboard Host Centos Server
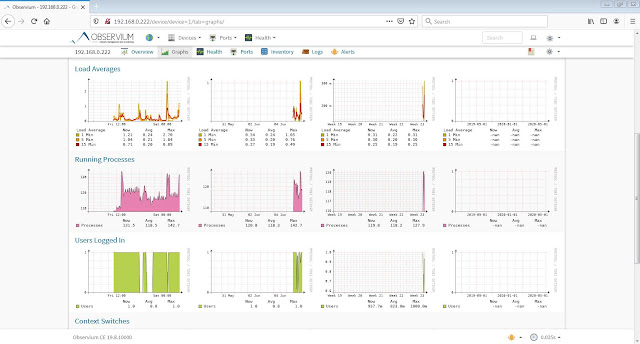
Tampilan Graph
Tampilan Graph
Kita juga dapat menambahkan titik kordinat untuk mengetahui posisi lokasi server
Tampilan Maps
Demikian kira-kira tutorial Cara Install Observium di Centos 7 ini saya buat. Semoga bermafaat untuk kita semua. Silahkan Share Jika sobat merasa postingan ini bermanfaat. Sekian & Terimakasih Salam.
Artikel Selanjutnya : Cara Install Observium di Ubuntu Server 20.04


Posting Komentar untuk "Cara Install Observium di Centos 7"