Cara setting NTP Server Centos 7

Cara setting NTP server Centos 7 - Pada tutorial kali ini saya akan share bagaimana cara install dan konfigurasi NTP Server menggunakan chrony di Centos 7 server. NTP atau Network Time Protocol adalah sebuah protokol yang digunakan untuk pengsinkronan waktu di dalam sebuah jaringan bisa pada jaringan LAN maupun pada jaringan internet.
Chrony adalah aplikasi yang dapat digunakan untuk membuat NTP Server pada system Linux. dan pada tutorial kali ini kita akan belajar cara install dan konfigurasi NTP Server menggunakan chrony di centos 7 server. Silahkan ikuti step by step cara installasinya.
Install NTP Server
Untuk installasi Chrony silahkan jalankan perintah dibawah ini.
[root@centos ~]# yum -y install chrony
Loaded plugins: fastestmirror
Loading mirror speeds from cached hostfile
epel/x86_64/metalink                                     | 5.7 kB     00:00
 * base: mirror.labkom.id
 * epel: ftp.iij.ad.jp
 * extras: mirror.idroot.cloud
 * updates: mirror.labkom.id
base                                                     | 3.6 kB     00:00
extras                                                   | 2.9 kB     00:00
updates                                                  | 2.9 kB     00:00
Resolving Dependencies
--> Running transaction check
---> Package chrony.x86_64 0:3.4-1.el7 will be installed
--> Processing Dependency: libseccomp.so.2()(64bit) for package: chrony-3.4-1.el7.x86_64
--> Running transaction check
---> Package libseccomp.x86_64 0:2.3.1-4.el7 will be installed
--> Finished Dependency Resolution

Dependencies Resolved

================================================================================
 Package             Arch            Version                Repository     Size
================================================================================
Installing:
 chrony              x86_64          3.4-1.el7              base          251 k
Installing for dependencies:
 libseccomp          x86_64          2.3.1-4.el7            base           56 k

Transaction Summary
================================================================================
Install  1 Package (+1 Dependent package)

Total download size: 307 k
Installed size: 788 k
Downloading packages:
(1/2): libseccomp-2.3.1-4.el7.x86_64.rpm                   |  56 kB   00:06
(2/2): chrony-3.4-1.el7.x86_64.rpm                         | 251 kB   00:08
--------------------------------------------------------------------------------
Total                                               35 kB/s | 307 kB  00:08
Running transaction check
Running transaction test
Transaction test succeeded
Running transaction
  Installing : libseccomp-2.3.1-4.el7.x86_64                                1/2
  Installing : chrony-3.4-1.el7.x86_64                                      2/2
  Verifying  : libseccomp-2.3.1-4.el7.x86_64                                1/2
  Verifying  : chrony-3.4-1.el7.x86_64                                      2/2

Installed:
  chrony.x86_64 0:3.4-1.el7

Dependency Installed:
  libseccomp.x86_64 0:2.3.1-4.el7

Complete!
[root@centos ~]# cp /etc/chrony.conf /etc/chrony.conf.backup[root@centos ~]# nano /etc/chrony.conf
# Use public servers from the pool.ntp.org project.
# Please consider joining the pool (http://www.pool.ntp.org/join.html).
#server 0.centos.pool.ntp.org iburst
#server 1.centos.pool.ntp.org iburst
#server 2.centos.pool.ntp.org iburst
#server 3.centos.pool.ntp.org iburst
server 0.id.pool.ntp.org
server 1.id.pool.ntp.org
server 2.id.pool.ntp.org
server 3.id.pool.ntp.org
# Allow NTP client access from local network.
allow 192.168.0.0/24[root@centos ~]# systemctl start chronyd
[root@centos ~]# systemctl enable chronyd[root@centos ~]# systemctl status chronyd
? chronyd.service - NTP client/server
Loaded: loaded (/usr/lib/systemd/system/chronyd.service; enabled; vendor preset: enabled)
Active: active (running) since Tue 2020-09-29 09:17:54 WIB; 14s ago
Docs: man:chronyd(8)
man:chrony.conf(5)
Main PID: 1436 (chronyd)
CGroup: /system.slice/chronyd.service
+-1436 /usr/sbin/chronyd
Sep 29 09:17:54 centos.local systemd[1]: Starting NTP client/server...
Sep 29 09:17:54 centos.local chronyd[1436]: chronyd version 3.4 starting (+C...)
Sep 29 09:17:54 centos.local systemd[1]: Started NTP client/server.
Hint: Some lines were ellipsized, use -l to show in full.[root@centos ~]# firewall-cmd --add-service=ntp --permanent
success
[root@centos ~]# firewall-cmd --reload
success[root@centos ~]# chronyc sources
210 Number of sources = 4
MS Name/IP address Stratum Poll Reach LastRx Last sample
===============================================================================
^? time.cloudflare.com 3 6 3 21 +761ms[ +761ms] +/- 64ms
^? time.cloudflare.com 3 6 3 21 +740ms[ +740ms] +/- 84ms
^? 202-65-114-202.jogja.cit> 2 6 3 21 +757ms[ +757ms] +/- 99ms
^? ns5.datautama.net.id 2 6 3 22 +809ms[ +809ms] +/- 232msPengetesan
Untuk pengetesan pada Client Centos silahkan install ntpdate lalu aktifkan service ntp pada firewalld
[root@srv1 ~]# yum -y install ntpdate
[root@srv1 ~]# firewall-cmd --add-service=ntp --permanent
[root@srv1 ~]# firewall-cmd --reload[root@srv1 ~]# ntpdate 192.168.0.232
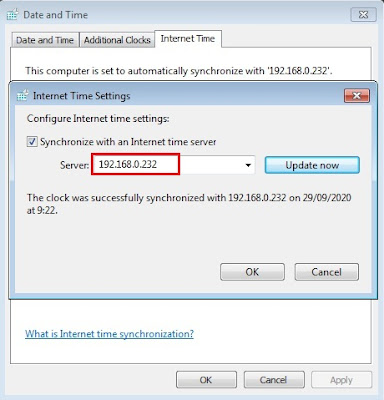
29 Sep 09:29:26 ntpdate[1560]: adjust time server 192.168.0.232 offset 0.214835 sec[root@srv1 ~]# systemctl enable ntpdateUntuk pengetesan pada Windows Client silahkan buka seting time zone pada lalu masukan IP Address Server lalu Klik Update JIka berhasil maka PC Client akan Syncronized dengan Server.

Demikian kira-kira tutorial Cara Install dan konfigurasi NTP Server di Centos 7 Server ini saya buat. Semoga bermafaat untuk kita semua. Silahkan Share Jika kalian merasa postingan ini bermanfaat. Sekian & Terimakasih Salam.
Artikel Selanjutnya : Cara Install DHCP Server di Centos 7

Posting Komentar untuk "Cara setting NTP Server Centos 7"